The last class of level 1, I started very slowly with this level because of the circumstances, but I am so glad I pushed through! This class about Inking Techniques, taught by Sara Naumann, was filled with fresh ideas and creative approaches. I truly enjoyed making the cards for this class, and I know I’ll be using these techniques more often and on more different kind of cards.
There are so many different inking techniques that it would take an entire blog to cover them all—but let me share a few that stood out for me in this class:
1. Simple Layered Stamping
You don’t always have to use every layer of a stamp set. With flowers, for example, skipping a layer can create a soft, elegant look.
Pro tip: Use a stamping block just slightly larger than your stamp for cleaner, sharper impressions.
2. Direct-to-Paper Inking
Apply ink directly to your cardstock edges for a distressed look, or cover the entire surface for a bold background.
3. Painting with Ink Pads
You can use your ink pads like watercolor paints.
Pro tip: Always heat emboss your stamped image first—or use embossing powder—so the lines stay crisp while you paint.
4. Stamp Block Inking
Experiment by inking up your acrylic block, spritzing with water, and pressing it onto cardstock. Different block sizes and water amounts will give different looks.
5. Brayer Techniques
Roll a brayer over your ink pad and then across your cardstock to create smooth, blended backgrounds.
I loved experimenting with these techniques. It’s amazing how a simple ink pad can turn into so many different looks. I kept it very basic on my cards now to practice the different techniques, but the possibilities are endless!


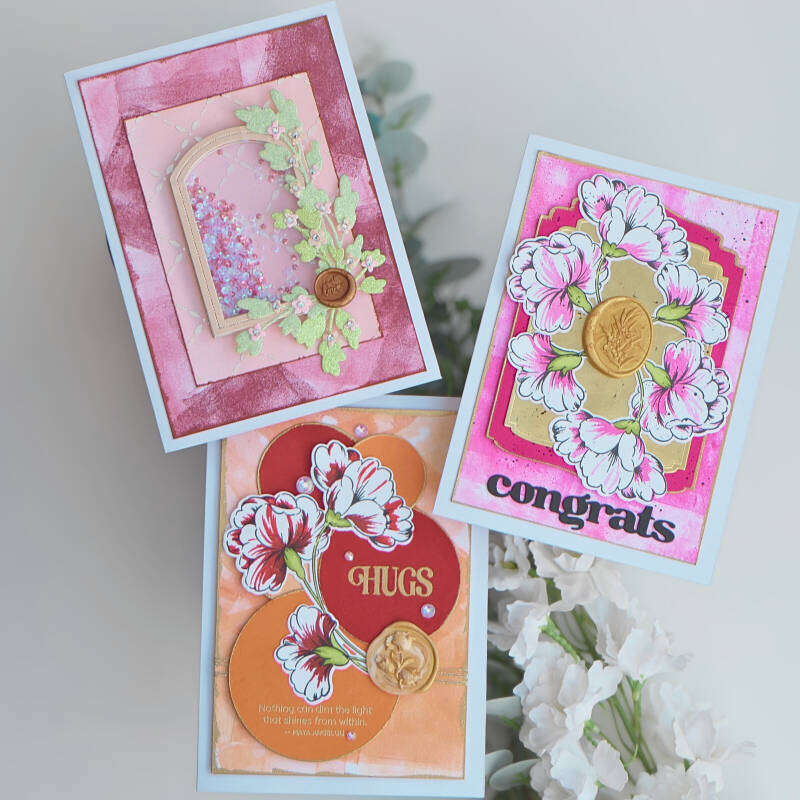
For my first card, I combined several irresistible inking techniques. The background was created with a brayer and a mix of ink colors, giving it a smooth, blended look. On top of that, I added layers using direct-to-paper inking with embossing ink, then heat embossed them with gold embossing powder for extra shine. I die cut the layers with the Ornate Nesting Dies.
For the flowers (set Sweet Flowers), I kept it simple—just the outline stamp and a single layer. It’s amazing how different and elegant they look this way! The sentiment comes from Versatile greetings 2, I die cut "congrats" in black and didn't use a shadow. To finish the card, I added a wax seal for a stylish finishing touch.


For my second card, I once again used the brayer background technique, this time keeping the colors softer. I die cut several circles in different sizes from the Fine Rings Die set, and gave each one its own color using direct-to-paper inking. So they have beautiful, bold colors. I could have used colored paper, but this way I can choose the exact color I want. All the edges of the circles and the background I embossed again with gold embossing powder, I love this technique.
For the flowers, I stuck to the same approach as before—just the outline stamp and a single layer—which keeps the look delicate and elegant. The sentiment and sub-sentiment were stamped in two of the circles and I gold embossed them. And of course, I finished it off with a wax seal for that extra special touch.
This card combines circle die cuts, soft stamping, and inking techniques for a clean and creative design.

And last but not least, Card 3! I just couldn’t resist making this one a shaker card (lol). For the background, I blended light and dark shades with the brayer, then added a second layer using the Lattice Blossoms stencil with pearl Shimmer Relief Paste for a calm, elegant effect.
I finished the edges with embossing ink and rose gold embossing powder for a touch of shine.
For the shaker window, I die cut a frame from the Regal Frame set using rose gold cardstock. To decorate, I added die-cut leaves and tiny flowers from Fairydust Glitter Cardstock, plus a few small pearls and a wax seal as the final touch.
So, three cards with more or less the same inking techniques but really different looks!
This last class of Level 1 gave me so much inspiration! From brayer backgrounds and direct-to-paper inking to embossing and shaker cards, these irresistible inking techniques have truly expanded my creative toolbox. I can’t wait for the final assignment to complete Level 1 of AECP—and then move on to the next level!
Thank you so much for visiting my blog. I hope you enjoyed following along, and I’d love to see you back here for the next step in my crafty journey!


Add comment
Comments
As always, your cards are SO gorgeous!
Thank you so much, Erum! You know that means a lot. 🫶