I kicked off the new year by creating Valentine cards, because let’s be honest, February 14th will be here before we know it. Although… I truly hope this year will feel a little calmer and won’t fly by in the blink of an eye like last year did.
So tell me, do you make Valentine cards? And if so… how many? One very special card, or a whole stack? I’d love to hear about it, so feel free to share in the comments.
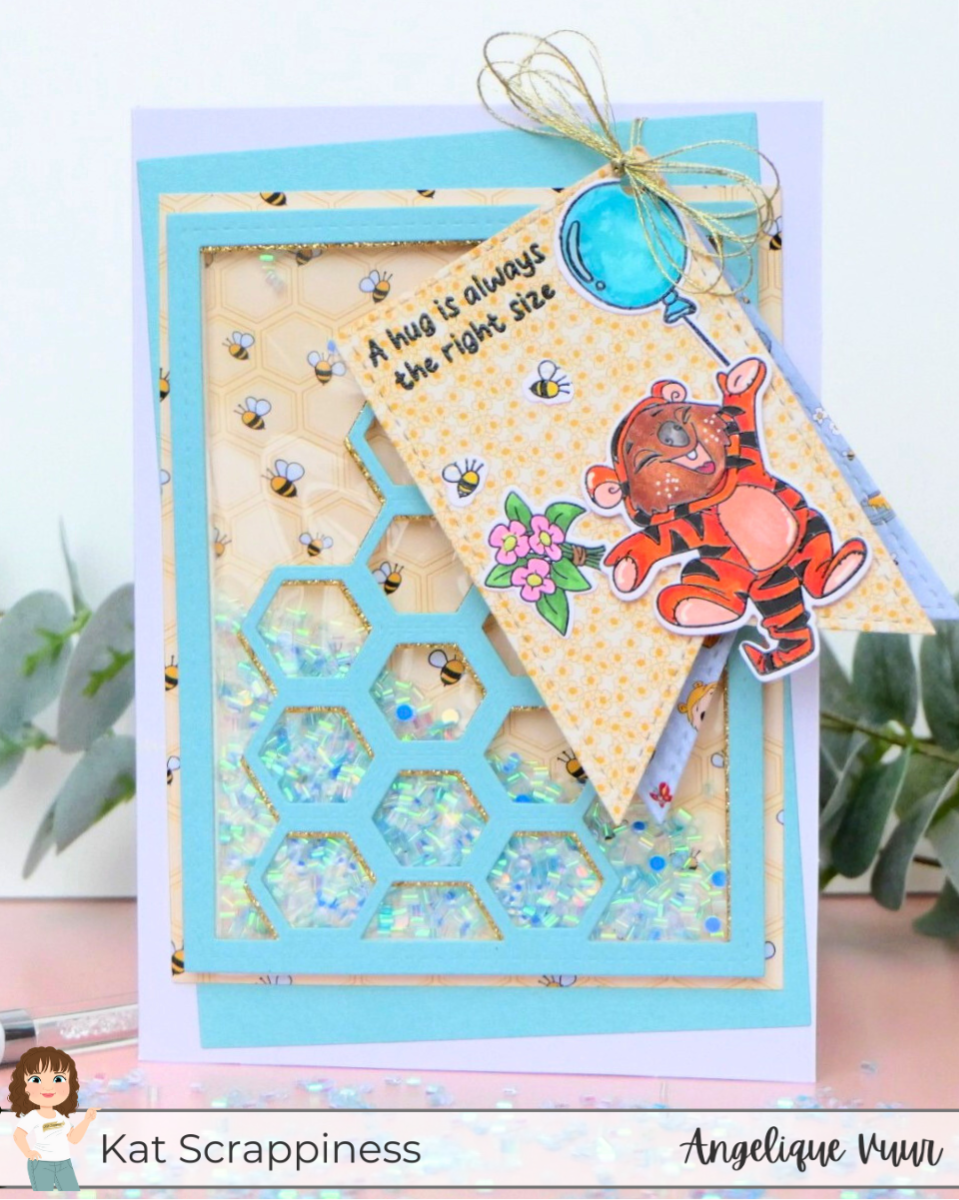
For today’s project, I created a fun Valentine shaker card featuring our famous Quokka, dressed up as a tiger, from the . Even the inside of the card got some love!
I promise—it may sound complicated now, but it really isn’t. So let’s get started!
Kat Scrappiness Products Used
- Hundred Acre Honeycomb Background Craft Die
- Hundred Acre Quokka 6×6 Paper Pack
- Hundred Acre Quokka Sentiment Stamp
- Hundred Acre Quokka Stamp Set
- Hundred Acre Quokka Coordinating Craft Dies
- Nesting Fishtail Banner Dies
- Sparkling Clear Shaker Tinsel
- Sky Blue Shaker Tinsel
- Brilliant Sky Blue Confetti Dot Sequins
- Judikins Diamond Glaze Dimensional Adhesive (2oz Precision Tip)
- Card Shoppe Essentials Clear Acetate Sheets 8.5 x 11
- Nuvo White Gel Pens
Card Details
No surprise here, I made this card as a 5 × 7 inch Valentine card, but it can easily be adapted to an A2 size. That said… you will miss that lovely white border around the card.
The shaker element itself is A2-sized, so if you plan to keep the card A2, you can simply ignore the extra mats I mention below.


Step 1 – Preparing the Background Pieces
I die cut the Hundred Acre Honeycomb Background Craft Die twice: once from light blue cardstock and once from gold glitter cardstock. We didn’t need the small honeycomb pieces for this project.
I glued the two layers together, slightly offset, blue on top, with the gold glitter peeking out just a little. After that, I trimmed the panel straight so no glitter showed on the outside edges.
Next, I cut a piece of acetate to 4¼ × 5½ inches and adhered it to the back of the honeycomb panel using strong double-sided tape. That small red tape is my favorite—we really don’t want shaker bits flying through the room when the card gets shaken.
If you prefer glue, make sure it’s strong and fully dry before moving on.
I then chose a piece of patterned paper from the Hundred Acre Quokka 6×6 Paper Pack. I went with soft colors this time, but bold or traditional Valentine colors would work beautifully too—it’s completely up to you.
Using my guillotine trimmer, I cut the patterned paper to 5¾ × 4½ inches, creating a small border around the shaker.
Lastly, I cut a piece of light blue cardstock to 4½ × 6½ inches (you can skip this step if you’re making an A2 card).
Step 2 – Finishing the Shaker
I added thin double-sided foam tape around the edges of the shaker panel. Before assembling everything, I brushed both the acetate and the sides of the foam tape with anti-static powder. This helps prevent the shaker elements from sticking.
I added Sparkling Clear Shaker Tinsel, Sky Blue Shaker Tinsel, and a small amount of Brilliant Sky Blue Confetti Dot Sequins, then carefully placed the patterned paper on top, making sure everything lined up nicely.
Tip: You can also reverse this process; place the shaker elements on the patterned paper first, then lower the foam-taped panel onto it. Use whichever method feels easiest for you.

Step 3 – Die Cutting and Stamping
For the tag, I selected two coordinating patterned papers from the same paper pack. One was more muted for the front, and the other could be a bit busier since it would sit behind it. I used die 3 from the Nesting Fishtail Banner Dies.
I punched a round hole near the top of the tags. I added mine later and had to go through the balloon instead of the sentiment…..oops. Lesson learned!
I stamped a short sentiment from the Hundred Acre Quokka Sentiment Stamp Set onto the front tag, keeping in mind that the Quokka and decorations would still be added.
Next, I stamped the Quokka Tiger, balloon, bees, and little bouquet from the Hundred Acre Quokka Stamp Set twice in black ink and heat embossed them with clear embossing powder. I colored everything with alcohol markers and then die cut the images using the Hundred Acre Quokka Coordinating Craft Dies.


Step 4 – Assembling the Card
I adhered the Quokka Tiger to the front tag with foam tape, and added the balloon, bouquet, and two bees with liquid glue.
Inside the card, I adhered the second Quokka Tiger, balloon, bouquet, and one bee in the lower middle of the right.
I folded a thin gold thread in half and again in half, threaded it through both tags, and tied a bow. I added a second piece of thread to attach the tag to the card.
To secure it neatly, I adhered the thread behind the blue cardstock panel, not behind the shaker. I then adhered the blue panel slightly off-center onto the card base, followed by the shaker panel placed straight on top.
Finishing Touches
I added white gel pen accents to both Quokka Tigers and finished the balloons with Judikins Diamond Glaze. Be sure to let the glaze dry completely before closing the card.
And that finished my card!

I truly enjoyed making this Valentine shaker card and hope you enjoyed this blog post as well. If you decide to create something inspired by this card, I’d love it if you tagged me on Instagram so I don’t miss it!
Thank you so much for visiting today, and don’t forget to check out What’s New at Kat Scrappiness for even more crafty inspiration.
Until next time!
Hugs,
Angelique
Angels Happy Cards for Kat Scrappiness
Add comment
Comments